Well by now you have probably gotten the sense that I don't check my blog/post very often.... Between school and other activities I have found it hard to find time to post. As for my last post, there will be no water cooling post as I was unable to obtain the funding necessary to purchase all of the requires supplies. I feel that I have not been very organized or devoted to this blog and will try to update it more often.
Now as far as updates on what Ive been up do, I have recently gotten back together with the Summer Engineering group and we are currently building a Mini electric go kart for this summers project. Our goals are to make it weigh 50 pounds or less and be easy to use etc. So far we have built the frame out of 1/8th inch aluminum sheet that has been water-jetted and are now moving onto the wiring stage (my department!). I will post pictures this weekend and will try to update you guys on the project as it progresses.
As for my DJing, I have slowly been building up my arsenal of lights and equipment. I post a new mix every few months and try to snag any gig I can get. I have now moved on to playing more Dubstep than Hardcore as people are more accepting of that type of electronic music. If you would like to listen to my mixes or want to like my artist page please visit www.facebook.com/audioinfection. There you will find links to my mixes/more info.
I also recently purchased my first laptop. It is an Asus G73SW and a beast of a laptop if I do say so myself. It gets the job done wonderfully and can run SolidWorks and high end games like a breeze. I will post more info soon. Another update computer wise is the new wiring in the desktop PC. I got sick of seeing the semi organized cables and decided to modify the case a little bit to accommodate the massive amount of wires. It now has a very clean look and I look forward to redoing the water cooling loop.
As I final note I just want to say thanks for all the loyal followers. I know that I have not been as dedicated as you have and would like to try and change that. Thanks for your support and I hope to keep updating this blog!
Tuesday, August 9, 2011

Sunday, April 24, 2011
Watercooling Review and Testing!
Hey guys! In a few weeks I will be posting a complete guide and step by step info on my new water cooling setup for my Desktop PC. I already have an all in one water cooling unit on the computer but I want to upgrade the loop and do some benchmark testing. What I will be testing for is performance differences between an all in one water cooling unit and a custom build loop. So stay tuned as more posts will come!
Wednesday, February 9, 2011
Chauvet Hurricane 700 LED MOD
 Since getting into DJing, I have purchased a large amount of DJ gear including a Chauvet Hurricane 700 fog machine. After using this great fogger for a while I encountered a problem which was fixed in the newer models; you cant see the fluid level meter in the dark. So I did what what any other LED fanatic would do. I grabbed my screw driver and took the fogger apart with the hopes of adding an LED to the fluid tank so that I would be able to see the fog level in the dark. So here is the instructable I whipped together a while ago to show how I went about adding an LED to the Chauvet Hurricane 700. Enjoy!
Chauvet Hurricane 700 MOD
Saturday, January 29, 2011
UPDATE?
In my last post I stated that I would continue to update this blog and continue to post all the projects that I have worked on... Well I guess not. It has now been seven months since my last post and I still have not completed my Xbox 360 mod due to personal reasons (I have gone through 3 Xbox 360s now and dont want to break another one....). Yes I will eventually finish that project but for now I am putting the project on hold.
As far as the projects go, I have not been working on any major ones recently. Due to the tremendous amount of school work that I have to do this year I haven't really had time work in the basement. I have been working a little bit on my old M1A1 Abrams model tank kit which is coming along nicely, as well as a few Airsoft modifications/rebuilds, and also some DJ light mods. I will post a few pictures in the coming weeks of the different things that i have been working on. Sometime this year I also plan on rebuilding the water cooling system of my computer and will definitely post pictures of that, so stay tuned!
As for the fish, they are doing swimmingly (excuse the pun) and are happier than ever. However since my last post about fish, I have had a large number of fish die. There is now only one guppy tank with two guppies left, and one shark and three tiger barbs have died in the 55 gallon tank. :( On the bright side, Humphrey has continued to grow as well as the two ID sharks (im going to need a bigger tank soon). I have also decided to redo all of the fish tanks so that they will be cleaner and will be easier to clean.
So hope you have enjoyed this update and I PROMISE that I will update this blog more regularly!
-Chris
P.S. Sorry about all the ads... I decided to use AdSense so that I can make a little money :)
As far as the projects go, I have not been working on any major ones recently. Due to the tremendous amount of school work that I have to do this year I haven't really had time work in the basement. I have been working a little bit on my old M1A1 Abrams model tank kit which is coming along nicely, as well as a few Airsoft modifications/rebuilds, and also some DJ light mods. I will post a few pictures in the coming weeks of the different things that i have been working on. Sometime this year I also plan on rebuilding the water cooling system of my computer and will definitely post pictures of that, so stay tuned!
As for the fish, they are doing swimmingly (excuse the pun) and are happier than ever. However since my last post about fish, I have had a large number of fish die. There is now only one guppy tank with two guppies left, and one shark and three tiger barbs have died in the 55 gallon tank. :( On the bright side, Humphrey has continued to grow as well as the two ID sharks (im going to need a bigger tank soon). I have also decided to redo all of the fish tanks so that they will be cleaner and will be easier to clean.
So hope you have enjoyed this update and I PROMISE that I will update this blog more regularly!
-Chris
P.S. Sorry about all the ads... I decided to use AdSense so that I can make a little money :)
Monday, May 3, 2010
Xbox Mobile Update
After a long period of inactivity, I am sorry to announce that the Xbox Mobile project will be postponed for a while. My Xbox started to malfunction and wouldn't work with my wireless controllers so I am holding off on the project until I can obtain a new Xbox. Thanks to all my readers!
EDIT: I bought a new Xbox on Ebay and hope to continue the project in a few months.
EDIT: I bought a new Xbox on Ebay and hope to continue the project in a few months.
Saturday, February 6, 2010
Xbox Mobile Update
>>Xbox Mobile V1.0: Part 2 (water cooling unit)<<
After the main disassembly of the Xbox and the water block installation, I then moved on to the water cooling unit. To begin, I started off by disassembling the liquid cooling unit (for those of you who don't know, this is the CoolIt Systems Domino ALC unit).
 The unit before disassembly
After the main disassembly of the Xbox and the water block installation, I then moved on to the water cooling unit. To begin, I started off by disassembling the liquid cooling unit (for those of you who don't know, this is the CoolIt Systems Domino ALC unit).
 The unit before disassembly
First I removed the four rubber anti vibration screws and the four regular screws that attach to the 120mm fan.

Next I removed the side panel that attaches to the radiator and the PCB inside.

 Here's a picture of the PCB

If you look at the picture of the radiator outlet port (the one above the pump) you will notice a black plastic ring inside of the port. This is the male end of the pump that was used to couple the pump and radiator together. For our application we will need this removed. So I grabbed a drill and flat head screwdriver and pried it out.
 After the ring had been removed

Next I removed the side panel that attaches to the radiator and the PCB inside.

 Here's a picture of the PCB
Then I proceeded by draining all the coolant from the closed-link system. So I grabbed an old glass container with a lid, and cut the tube with an Exacto knife, which allowed the coolant to drain.
 I found it was easiest to drain when the radiator was elevated.

 All the drained coolant
Now that all the liquid had been drained I cut off all the old tubing from the remaining parts. Remember to be careful to not cut too deep; this can damage the hose barbs.
 I found it was easiest to drain when the radiator was elevated.
 All the drained coolant
Now that all the liquid had been drained I cut off all the old tubing from the remaining parts. Remember to be careful to not cut too deep; this can damage the hose barbs.

After all the tubes had been removed I then removed the pump from the radiator. To do this I used a hack saw and cut the metal outlet port to separate the pump from the radiator. Make sure you don't cut too close to the pump inlet port.
 The pump after separation
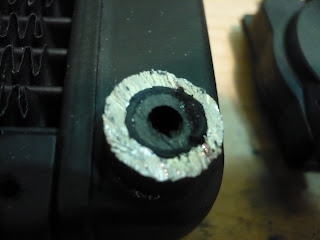 The outlet port after cutting
 The pump after separation
 The outlet port after cutting
Next I used a file to smooth the edges of the outlet and inlet ports on the radiator and pump.
 Almost done!

 Almost done!
If you look at the picture of the radiator outlet port (the one above the pump) you will notice a black plastic ring inside of the port. This is the male end of the pump that was used to couple the pump and radiator together. For our application we will need this removed. So I grabbed a drill and flat head screwdriver and pried it out.
 After the ring had been removed
After looking through several hardware stores I was unable to find a hose barb that would fit inside the outlet hole. So I was forced to find another solution. While thinking about how I could solve this problem, I came across the original water block that came with the ALC system. This water block had two hose barbs that had the same ID (inner diameter) as the other barbs (the one on the other side of the radiator and on the pump), thus creating a perfect solution.
So I once again grabbed my hack saw and cut off the two barbs at the base where they connect to the water block.
 One more barb to go!
So I once again grabbed my hack saw and cut off the two barbs at the base where they connect to the water block.
 One more barb to go!
After removing the two barbs, I filed the bottoms so that there would be a nice flat seal on the inside of the port.


Next I placed the filed barb inside the outlet port to check the size. The base of the barb was just a little bit too big, so I got out my drill and widened the hole.
 Before drilling

 After drilling!
 On the right side of the barb you can see a small puddle forming.
 Gotta love epoxy!


Next I placed the filed barb inside the outlet port to check the size. The base of the barb was just a little bit too big, so I got out my drill and widened the hole.
 Before drilling
 After drilling!
After some pressure leak testing, I found that for the most part, the new barb had created a tight seal. But there was still a little bit of water seeping out. So I grabbed my Gorilla epoxy and applied a generous amount to the base of the barb.
 On the right side of the barb you can see a small puddle forming.
 Gotta love epoxy!
Now that the epoxy had been applied, I let the radiator sit for a few days to dry. In the mean time I took the remaining barb and attached it to the input side of the pump. To do this, I drilled out the middle of the pump input port so that the remaining barb could fit inside.
 The pump after the newly drilled hole
 Yay it fits!
 The pump after the newly drilled hole
 Yay it fits!
Now that the other hose barb had been attached to the pump, I applied some more epoxy to secure it.

This concludes part 2 of the Xbox Mobile modification. Stay tuned for more updates and part 3!
>>End of part 2<<

This concludes part 2 of the Xbox Mobile modification. Stay tuned for more updates and part 3!
>>End of part 2<<
Wednesday, January 27, 2010
Xbox Updates
After a few hours of contemplation, I have decided that I am going to take my Xbox mod to the next level. Since this mod has only been done a couple of times (to my knowledge), this seems like an appropriate endeavor. Not only will I be water cooling my Xbox, I am also going to build it into a Husky tool case, with a 20" LCD monitor, water cooling (of course), and maybe a keyboard. For this mod I will be implementing many of the same techniques as Ben Heck, who is in my book, a modding genius. If you are interested in other game system mods, and an amazing Xbox 360 laptop, check him out at http://benheck.com/.
Also my last post explains my reasons for doing this mod and some terminology that may be helpful to know.
So now lets start off with some of my goals for this project. My over all goal for this project is to have a working Xbox laptop/mobile case. The Xbox will be water cooled and integrated into a Husky metal tool case with speakers, a 20" monitor and maybe a keyboard if it will fit. So what are we waiting for?! Lets go!
>>Xbox Mobile V1.0: Part 1<<
After much indecisiveness on whether or not I was going to take my Xbox apart, I finally made the decision to modify my beloved Xbox 360. To start off I brought my Xbox down into my basement workshop and began to gather my main materials. For basic materials I used an Xbox 360, an XSPC Xbox water block, and a CoolIt Domino ALC Liquid Cooling system.

Next I proceeded by disassembling my Xbox (for this project I wont show the disassembly process. If you don't know how to take your Xbox apart here is a good guide http://llamma.com/xbox360/repair/Xbox-360-Disassembly.htm).
 The Xbox after disassembly
After removing the two case halves, the motherboard was revealed.
 Then I proceeded by removing the disk drive, fan duct, and fan from the metal case. All that was left was the main board.
 Now that the Xbox had been stripped of its main components, I then began to remove the heatsinks from the GPU and CPU. Here is a picture of what the CPU and GPU looked like after removing the heat sinks.

 I have alot of thermal paste to remove...

 Almost done!

 Oops! Applied a little too much thermal paste!


 All done!
Also my last post explains my reasons for doing this mod and some terminology that may be helpful to know.
So now lets start off with some of my goals for this project. My over all goal for this project is to have a working Xbox laptop/mobile case. The Xbox will be water cooled and integrated into a Husky metal tool case with speakers, a 20" monitor and maybe a keyboard if it will fit. So what are we waiting for?! Lets go!
>>Xbox Mobile V1.0: Part 1<<
After much indecisiveness on whether or not I was going to take my Xbox apart, I finally made the decision to modify my beloved Xbox 360. To start off I brought my Xbox down into my basement workshop and began to gather my main materials. For basic materials I used an Xbox 360, an XSPC Xbox water block, and a CoolIt Domino ALC Liquid Cooling system.
Next I proceeded by disassembling my Xbox (for this project I wont show the disassembly process. If you don't know how to take your Xbox apart here is a good guide http://llamma.com/xbox360/repair/Xbox-360-Disassembly.htm).
 The Xbox after disassembly

 Now that the Xbox had been stripped of its main components, I then began to remove the heatsinks from the GPU and CPU. Here is a picture of what the CPU and GPU looked like after removing the heat sinks.

 I have alot of thermal paste to remove...
In order to remove the old thermal paste, I used rubbing alcohol, some Qtips and alot of patience. Because the thermal paste was old and had under gone many temperature changes, it was hard and gummy, so I dabbed the rubbing alcohol onto the old thermal paste and let it sit for a while.

In the mean time, I picked up a pack of Thermaltake Copper Memory Heatsinks, and applied them to the surrounding chips. These heatsinks will hopefully disperse even more heat.
 Nice!
Nice!
 Nice!
Nice!After applying heatsinks to all the large chips I moved back to the cleaning process at hand. I kept reapplying the alcohol when it had evaporated, until I felt a change in consistency of the paste. When I felt that I had soaked the thermal paste in the alcohol long enough, I then moved on to using Qtips and paper towel to smear off the paste.
 Almost done!
Finnaly after 3o minutes of work, I had succeded in cleaing off most if not all of the old thermal paste.
 Its so shiny!!!!!
 Its so shiny!!!!!
Now that all the thermal paste had been removed, I grabbed my recently purchased tube of Arctic MX-3 Thermal Compound, and began to apply it to the freshly cleaned chips.

 Oops! Applied a little too much thermal paste!
I then grabbed my XSPC water block and screws, and positioned them on the mother board (I found that it was easier to attach the water block when holding it sideways so as not to smudge the thermal paste).


After a long and uncomfortable 10 minutes, I had finnaly attached the water block to the mother board (yay!). Now time to take a break after a long day...
 All done!
Next we will be focusing on the water cooling system so stay tuned!
>>End of part 1<<
Subscribe to:
Posts (Atom)