After the main disassembly of the Xbox and the water block installation, I then moved on to the water cooling unit. To begin, I started off by disassembling the liquid cooling unit (for those of you who don't know, this is the CoolIt Systems Domino ALC unit).
 The unit before disassembly
First I removed the four rubber anti vibration screws and the four regular screws that attach to the 120mm fan.

Next I removed the side panel that attaches to the radiator and the PCB inside.

 Here's a picture of the PCB

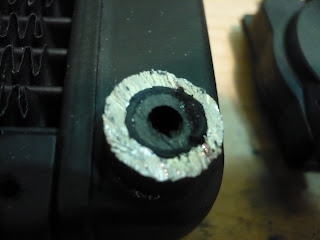
If you look at the picture of the radiator outlet port (the one above the pump) you will notice a black plastic ring inside of the port. This is the male end of the pump that was used to couple the pump and radiator together. For our application we will need this removed. So I grabbed a drill and flat head screwdriver and pried it out.
 After the ring had been removed

Next I removed the side panel that attaches to the radiator and the PCB inside.

 Here's a picture of the PCB
Then I proceeded by draining all the coolant from the closed-link system. So I grabbed an old glass container with a lid, and cut the tube with an Exacto knife, which allowed the coolant to drain.
Now that all the liquid had been drained I cut off all the old tubing from the remaining parts. Remember to be careful to not cut too deep; this can damage the hose barbs.
Now that all the liquid had been drained I cut off all the old tubing from the remaining parts. Remember to be careful to not cut too deep; this can damage the hose barbs.

After all the tubes had been removed I then removed the pump from the radiator. To do this I used a hack saw and cut the metal outlet port to separate the pump from the radiator. Make sure you don't cut too close to the pump inlet port.
If you look at the picture of the radiator outlet port (the one above the pump) you will notice a black plastic ring inside of the port. This is the male end of the pump that was used to couple the pump and radiator together. For our application we will need this removed. So I grabbed a drill and flat head screwdriver and pried it out.
 After the ring had been removed
After looking through several hardware stores I was unable to find a hose barb that would fit inside the outlet hole. So I was forced to find another solution. While thinking about how I could solve this problem, I came across the original water block that came with the ALC system. This water block had two hose barbs that had the same ID (inner diameter) as the other barbs (the one on the other side of the radiator and on the pump), thus creating a perfect solution.
So I once again grabbed my hack saw and cut off the two barbs at the base where they connect to the water block.
 One more barb to go!
So I once again grabbed my hack saw and cut off the two barbs at the base where they connect to the water block.
 One more barb to go!
After removing the two barbs, I filed the bottoms so that there would be a nice flat seal on the inside of the port.


Next I placed the filed barb inside the outlet port to check the size. The base of the barb was just a little bit too big, so I got out my drill and widened the hole.

 After drilling!
 On the right side of the barb you can see a small puddle forming.
 Gotta love epoxy!


Next I placed the filed barb inside the outlet port to check the size. The base of the barb was just a little bit too big, so I got out my drill and widened the hole.

 After drilling!
After some pressure leak testing, I found that for the most part, the new barb had created a tight seal. But there was still a little bit of water seeping out. So I grabbed my Gorilla epoxy and applied a generous amount to the base of the barb.
 On the right side of the barb you can see a small puddle forming.
 Gotta love epoxy!
Now that the epoxy had been applied, I let the radiator sit for a few days to dry. In the mean time I took the remaining barb and attached it to the input side of the pump. To do this, I drilled out the middle of the pump input port so that the remaining barb could fit inside.


0 comments:
Post a Comment